

STUG 33B Let’s do this properly.
- lilofandy
- Jan 5, 2021
- 4 min read
Updated: Jan 6, 2021
Happy New year! Here's hoping a return to our normal lives as soon as possible.
I was bitten by the Stalingrad bug when Warlord released the Stalingrad set last year primarily for the Sarrissa factory (and so much so that I have since picked up a second factory). My aim was and still is, to use the factory to recreate the Collombelle industrial area in Caen. But the Russian winter chill set in and I’m now the proud owner of 2 opposing and as yet unfinished Soviet and German armies. See welcome-to-the-frozen-east . The Stalingrad campaign book contains reference to the Stug 33B- in simple terms a panzer 3 chassis with a 15 cm SIG33 gun strapped to it and encased in a steel box for dealing with those pesky fortified positions.

There were never vary many built (less than 100) and the only remaining example is in the Russian tank museum. It has however become synonymous with Stalingrad. I had to have one!
The Stalingrad release was not far off the release of Rubicon’s Panzer III. This is the holy grail of panzer III's in 1.56/28mm. 22 variants across 3 boxes. I love this kit. There is however, very little option with the sourcing the 33B. Currently the only option is the Company B offering and a 3 D printed option, there may be another on the way but that is not confirmed as yet. So, Company B it is. Now, being from the US, due warning guys Customs fees Suck! There is a UK distributor through Great Escape Games, but patience was never my thing (they didn’t have it in stock) so…. I took the pain. Full credit to Company B their customer care was great, and I must extend my thanks to Bruce Meyer for his help. On top of the 33b I picked up the Bergepanzer III conversion kit and something that brought a surge of joy and will be the subject of another post. A German field kitchen, A GulashKanone! In 1.56/28mm!!!!!!!! (absolutely no gaming value, but still as cool as a polar bear’s cold bits!)
Now, I’m a plastic addict. I’ll do Resin if I have to and I do have quite a bit, but I much prefer plastic. So, my German army has ended up with 3 Rubicon Panzer 3. I wanted the kits to all look consistent so, while the Company B kit is perfectly fine, for consistency I decide to hybrid the 33B with a Rubicon Chassis and the Company B Superstructure. My plan at this point is that the Bergepanzer 3 conversion kit will use the leftover resin chassis. Nothing goes to waste. I won’t give a long narrative, hopefully the series of photos that follow (with the odd comment) will give enough guidance on how I did this should you feel like doing the same.
Couple of things, while in 1.56/28mm there is only a small offering, there are several 1.35 and 1.72/76 kits out there to use as reference, I regularly look at some of the work of 1.35 modellers. But they all have issues. Those that are into that kind of thing can read up at length about chassis and types and the likes. I went to the photo gallery; life is too short. So, the result of that? Early and mid/late chassis and running gear were used (but in both cases there is no chassis escape hatch on either side as portrayed on many of the kits – including the Company B one) the engine hatches vary; the rear deck sports a single or a double storage trunk. Now dependent on your ethos that means either quite a bit of work to get it as accurate as possible or….you make some compromises in order to get a model that you feel comfortable is not going to get Rivet counters (one Rivet…2 rivets….3…….I Love to Count ha…ha…ha…!) on your case at first glance. This would be my path.

So this is the concept, the Rubicon Chassis built to suitably represent what the reference pictures show. I chose the Command vehicle box of the 3 Rubicon Panzer III choices since it contains both early and mid/late chassis options and so has the greatest flexibility.

One minor problem is that there is a little sizing issue. The superstructure is a little narrow. But this structure is not some stylised wind tunnel tested aerodynamic build. This is practical engineering, big slabs of sheet steel, welded and rivetted. So the addition of some plasticard either side brings the result as close as possible to the real thing. Pictures suggested that the engine deck configuration was a little different than the various versions shown in the kit instructions . However its an easy fix. Just turn them 90 degrees.

the upper in each set above all that is then required is to reposition the hinges.
From there its a case of adding details and accessories. I chose in this case to have the hatches closed. This thing used to get in a little close and personal so the avoidance of the odd grenade through a hatch was the order of the day.


Bit of filling here and there. I need to go over it again to ensure everything looks nice and flush- although I find that undercoating first revels all the blemishes gaps and the like so that will come first.
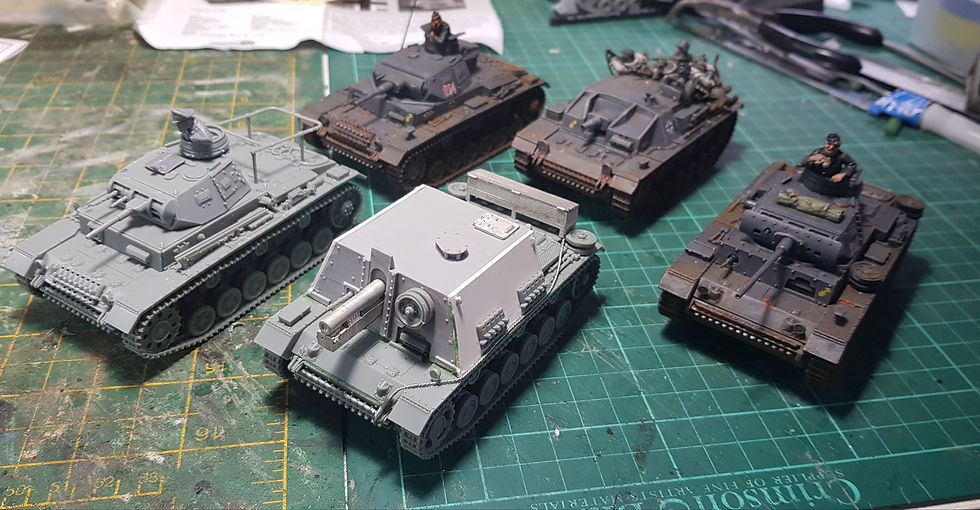
So, here's the fleet, all on Rubicon Chassis with the exception of the Stug Ausf D- The Warlord Resin. The Command Panzer III to the left is the base kit used for the 33B.
Nice and simple really, I had expected it to be more problematic and as mentioned above it may not be 100% accurate however, it satisfies my requirement. At this point the build is complete. Paint will follow, so there will be a part 2 coming.
Cheers
Andy
6, 5 Out
コメント